

How to Sew a Christmas Stocking: A Simple 8-Step DIY Guide for Beginners
If you’ve ever wondered how to sew a Christmas stocking but felt a bit intimidated by curves, cuffs and lining, this guide is for you. Together we’ll walk through how to sew a lined Christmas stocking, including how to sew a Christmas stocking with cuff, and even how to sew a Christmas stocking with lining and cuff in one simple project. You’ll learn what fabrics to choose, how to cut your pieces, and exactly how to assemble everything so your stocking looks neat, hangs well and lasts for many holidays to come. Whether you’re using new fabric or upcycling an old shirt or curtain, you’ll finish this guide with a personalised stocking you’re proud to hang up.
Why Sew Your Own Christmas Stocking?
Sewing your own stocking gives you far more than a place for treats. It’s a small project that lets you experiment with colours, textures and trims without a huge fabric bill or time commitment. Many sewists report that a simple, lined stocking with cuff can be finished in under two hours once you know the steps.
DIY stockings are also perfect for:
- Personalisation – add names, initials, favourite colours or themes.
- Sustainability – use up fabric scraps or upcycle clothes instead of buying new décor.
- Budget control – most patterns use around half a yard of fabric or less for a standard size stocking.
- Skills practice – you’ll sew curves, manage lining and try a simple cuff all in one project.
Because you’re learning how to sew a lined Christmas stocking, you’ll also gain techniques you can reuse for bags, pouches and other lined projects throughout the year.
Materials You Need to Sew a Christmas Stocking
Essential Sewing Tools for Christmas Stocking
You don’t need an advanced sewing room to learn how to sew a Christmas stocking. These basics are usually enough:
- Sewing machine (a straight stitch and optional zigzag are plenty)
- Sharp fabric scissors or rotary cutter and mat
- Straight pins or clips
- Measuring tape or quilting ruler
- Fabric marking pen or tailor’s chalk
- Iron and ironing board (for crisp seams and cuffs)
- Paper Christmas stocking template (printed or drawn by hand)
- Matching sewing thread
Many free stocking patterns include a printable template you can tape together and reuse. Sites such as LearnCreateSew, My Golden Thimble and Waves & Wild offer free or low-cost stocking templates you can print at home.
Christmas Stocking Fabrics to Choose
The best fabric for your stocking depends on the look and feel you want. Tutorials and fabric guides often recommend medium-weight woven fabrics such as quilting cotton, linen, flannel, wool, velvet or pre-quilted fabric for the outer layer.
Here’s a quick comparison to help you decide:
| Fabric type | Look & feel | Best for |
|---|---|---|
| Quilting cotton | Crisp, easy to sew, huge range of prints | Beginners, patchwork fronts, kids’ designs |
| Cotton velvet or velour | Soft, luxurious, slightly heavier | Classic mantel stockings, rich colours |
| Felt or wool blend | Soft, slightly structured, doesn’t fray much | Appliqué, hand-stitched or rustic styles |
| Linen or flannel | Natural, cosy texture | Modern, minimalist or Scandinavian looks |
| Sources: Crafty Sewing Sew; Sew DIY stocking fabric guide; MerryStockings fabric descriptions; UK Fabrics Online seasonal fabric guide. | ||
For the lining, choose a smooth fabric like quilting cotton so treats slide in easily. For the cuff, cotton velvet, faux fur or a contrasting quilting cotton work very well.
Read More: How to Decorate With Christmas Lights Indoors: 9 Ways for Your Dormitory (2025 Guide)
How to Sew a Christmas Stocking
This section shows you exactly how to sew a Christmas stocking with lining and cuff, step by step. You’ll cut an outer stocking, a lining, a cuff and a hanging loop, then assemble them so all raw edges are hidden.
Step 1: Print & Prepare Your Pattern
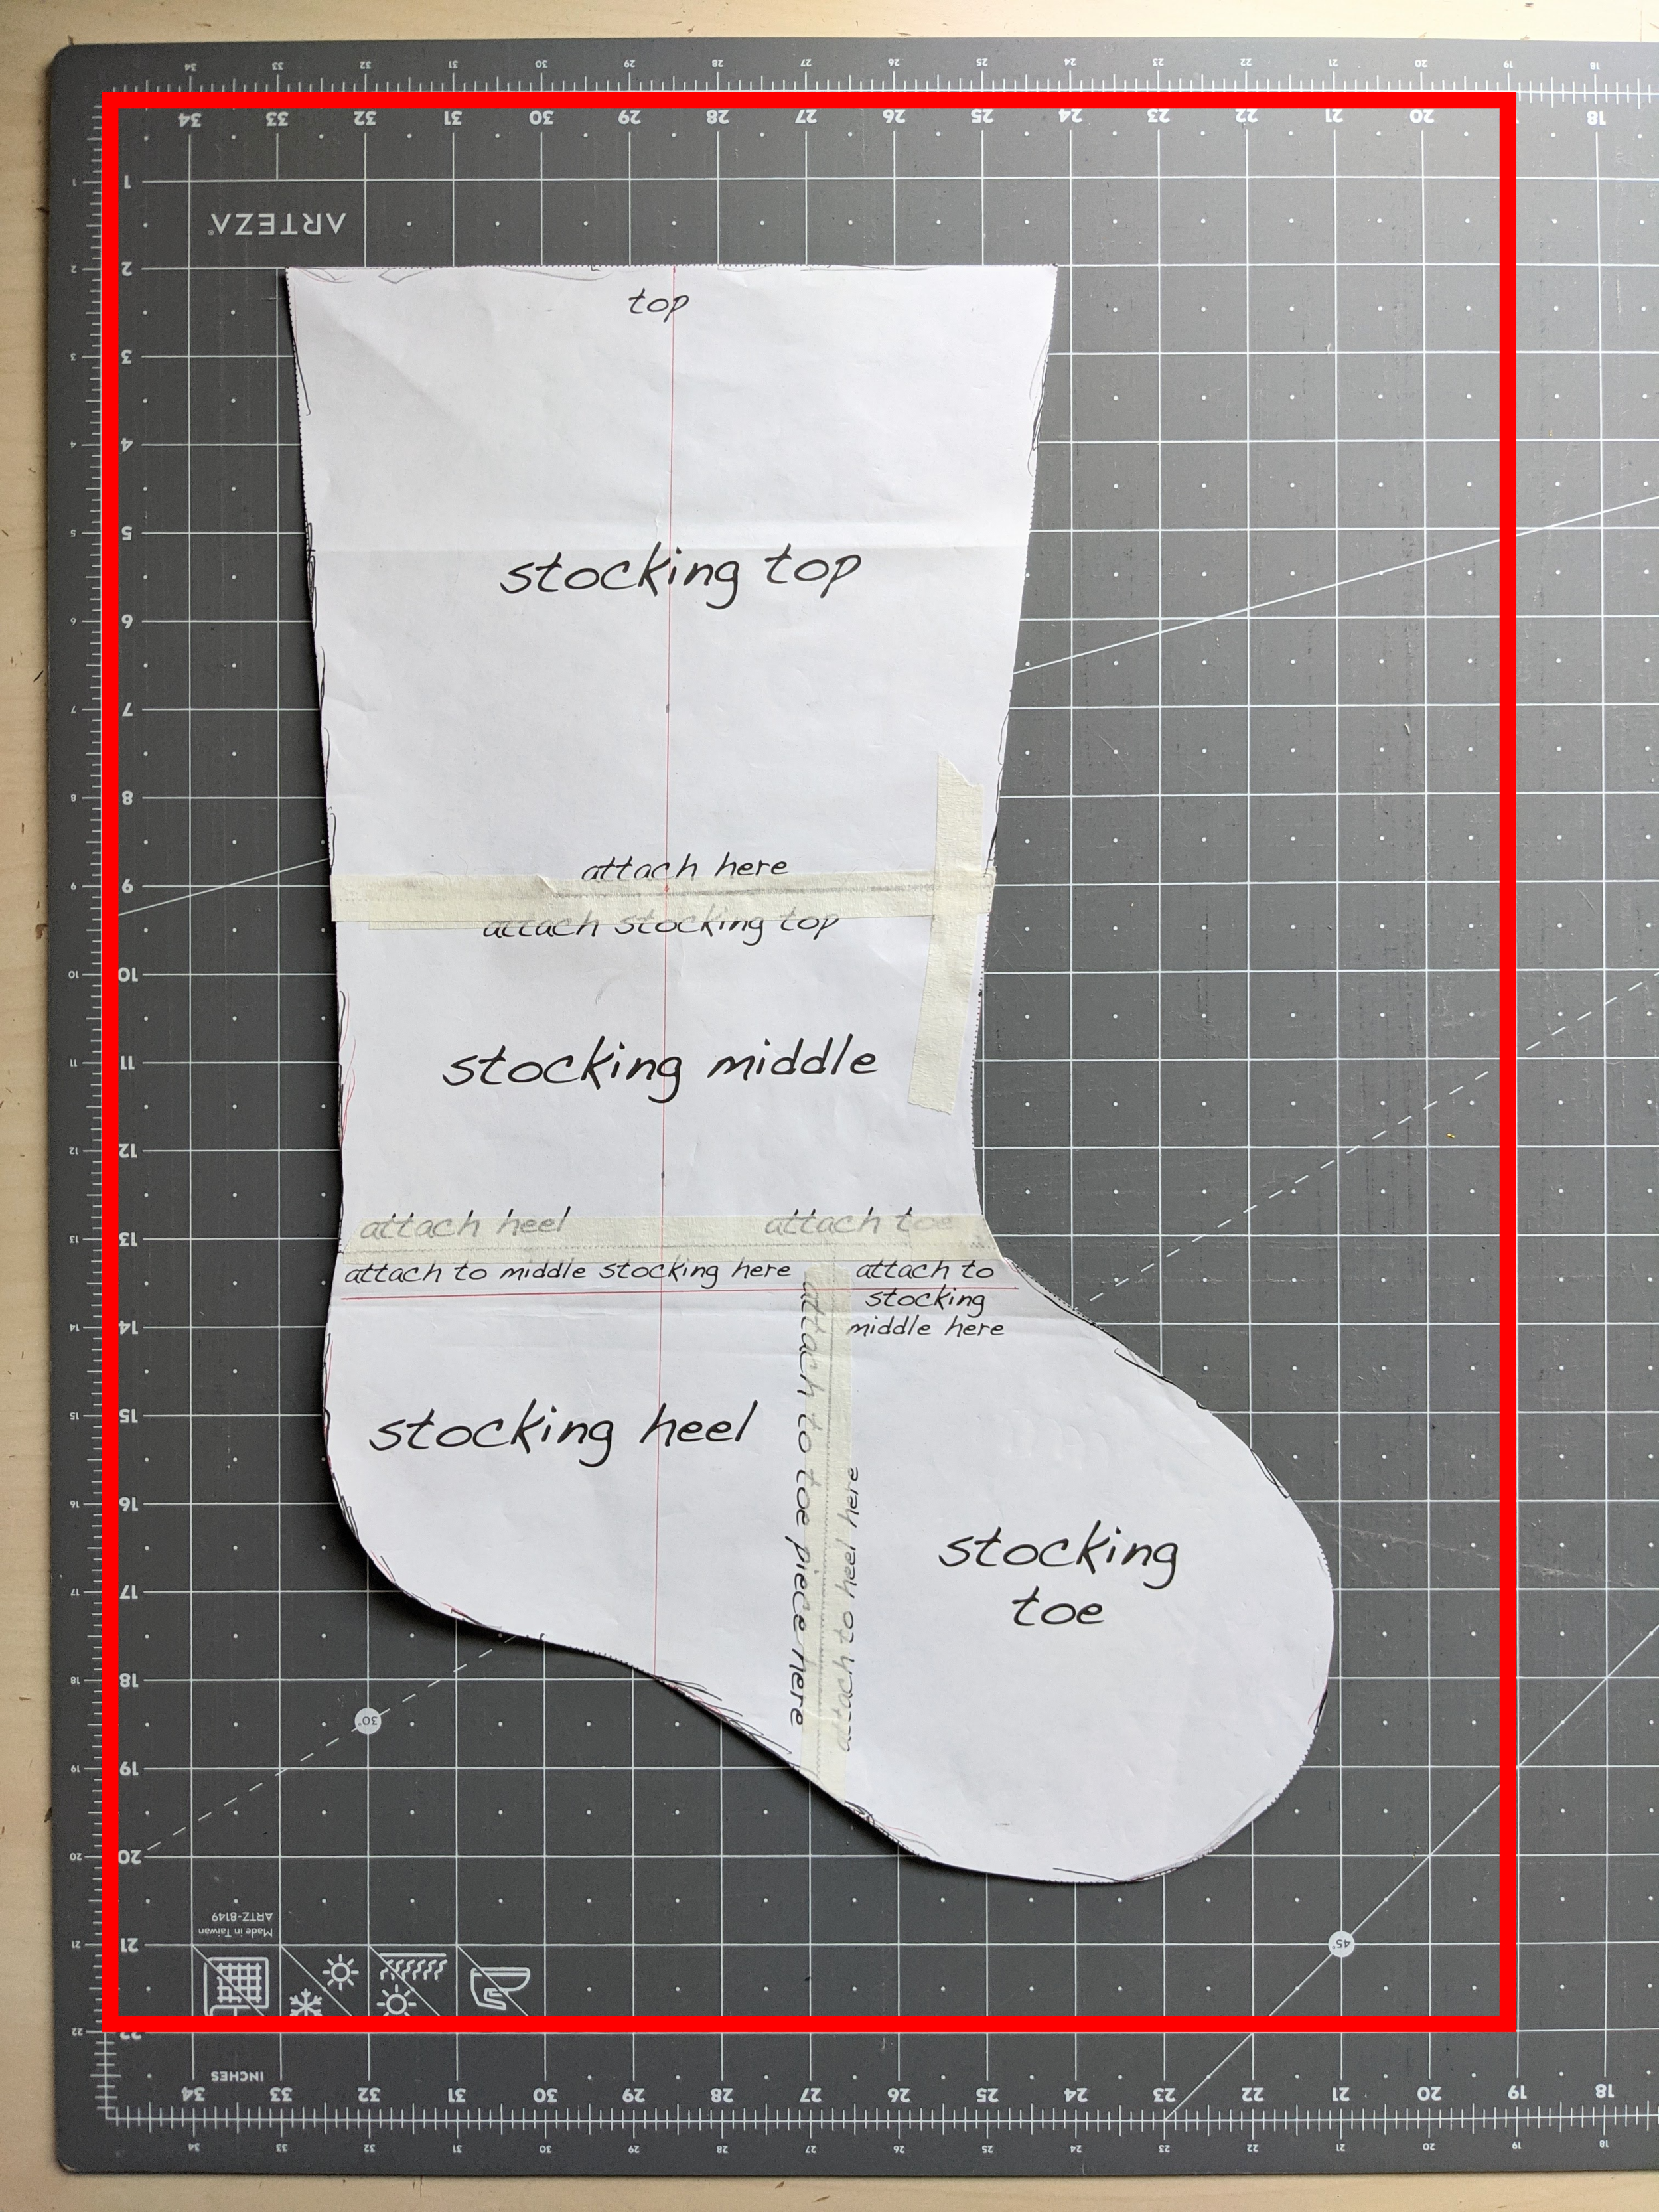
Start by printing your stocking pattern from the source provided. You’ll usually see two cutting lines:
- Solid line – used for the main (outer) fabric piece.
- Dotted line – slightly smaller and used for the lining piece.
Cut one paper pattern on the solid line and another on the dotted line. Having the lining pattern slightly different helps the stocking lay flatter and look more professional once finished.
Step 2: Select & Cut Your Christmas Stocking Fabric

Choose your outer and lining fabrics. The video example uses flannel for both inner and outer layers, but you can also use cotton or fleece. Pay attention to fabric direction if your print includes words or directional motifs—make sure the “top” of the design will be at the stocking’s opening, not upside down at the toe.
- Fold the outer fabric with right sides together.
- Place the main (solid-line) pattern piece on the fabric in the correct direction and trace or pin.
- Cut out two outer stocking pieces.
- Repeat the process with the lining fabric using the lining pattern (dotted-line piece) to cut two lining pieces.
By the end of this step, you should have four fabric pieces in total: two outer and two lining.
Step 3: Pin and Sew the Front and Back Panels

Now you’ll create the outer shell of the stocking.
- Place the two outer stocking pieces right sides together.
- Pin or clip all around the sides and toe, leaving the top edge completely open.
- Sew around the sides and bottom using a 3/8″ seam allowance, backstitching at the beginning and end.
This forms the main stocking body that you’ll see on the outside once everything is turned.
Step 4: Add the Hanging Loop & Sew the Lining Pieces
The hanging loop is sewn into the lining so it’s clean and secure when the stocking is finished.
- Cut a piece of ribbon or fabric strip about 5″ (12–13 cm) long.
- Fold it in half to form a loop, with the right side of the ribbon facing out.
- Place the two lining pieces right sides together.
- Locate the mark on the pattern where the loop should be positioned (usually near the back seam, just above the cuff fold line).
- Sandwich the raw ends of the loop between the two lining layers at that mark, with the loop pointing downwards into the stocking and the raw ends aligned with the top edge.
- Pin or baste the loop in place so it doesn’t shift.
- Pin around the lining edges, leaving the top open and marking a gap (turning opening) on a straight section away from the cuff area.
- Sew around the sides and bottom of the lining using a 3/8″ seam allowance, backstitching at the start, end and across the loop to secure it.
Make sure to leave that turning gap unstitched; you’ll need it later to turn the whole stocking right-side out.
Step 5: Clip the Curves for a Smooth Shape

To help your stocking curves lie flat and smooth, you need to reduce bulk around the toe and heel.
- Using regular scissors or pinking shears, carefully clip into the seam allowance along the curved parts of both the outer stocking and the lining.
- Space your clips or notches evenly, taking care not to cut into the stitching.
- Do not clip into the turning gap on the lining; keep that area intact to make closing it easier later.
This simple step makes a big difference in how professional your finished stocking looks.
Step 6: Combine the Outer Stocking, Lining & Cuff

At this point, the tutorial uses a fold-over cuff made from the same stocking pieces, rather than a separate cuff piece. If you plan to add a contrasting cuff later, you can adapt this step, but the basic construction is the same.
- Turn the lining right side out; keep the outer stocking wrong side out for now.
- Insert the right-side-out lining inside the outer stocking so that right sides are facing each other.
- Align the top edges and match side seams. The loop should sit between the layers at the back.
- Pin all around the top opening, making sure there are no twists and that the loop remains in the correct position.
- Sew all the way around the top edge with the same seam allowance, again being careful not to catch extra folds of fabric under the needle.
Now the outer stocking, lining and loop are all connected at the top edge in one clean seam.
Step 7: Turn the Stocking Right-Side Out
This is the “magic” part where everything flips to the right side.
- Reach through the turning gap left in the lining.
- Gently pull the outer stocking and lining through that opening, turning everything right-side out. Start by grabbing the toe and pulling it through first.
- Use your fingers or a blunt turning tool to push out the curves and corners so the stocking takes its full shape.
- Once it looks good, close the turning gap in the lining by hand (ladder stitch) or by machine with a narrow seam close to the edge.
- Tuck the lining down inside the outer stocking, smoothing it into the toe and heel area.
Your stocking should now look complete, with the loop emerging neatly at the top edge.
Step 8: Add Final Touches & Fold the Cuff
To create the fold-over look and refine the finish:
- With the lining tucked inside, gently tug and smooth the stocking until it hangs nicely.
- Fold the top of the stocking down toward the outside to form a cuff. The fold usually sits just below the base of the hanging loop, so the loop sits above the cuff for easy hanging.
- Adjust the fold until the cuff height looks balanced.
- If you’re using slippery or thick fabrics (like velvet), you can mark the cuff fold line and sew a line of stitching around it to keep the cuff and lining together.
At this stage, you can also add embellishments such as names, buttons, bows or trims to personalise your stocking.
Read More: Best Christmas Light Colors 2025: Top 8 Color Themes for Cozy Indoor Decorating
Beginner Tips for Sewing a Christmas Stocking
How to Sew Curves Smoothly
Sewing curves is often what makes beginners nervous about how to sew a Christmas stocking, but a few habits make it much easier:
- Go slowly around the toe and heel; speed is not your friend here.
- Use more pins or clips than you think you need, especially with slippery fabrics like velvet.
- Shorten your stitch length slightly on tight curves; this makes the seam smoother.
- Stop with the needle down to pivot slightly as you follow the curve.
- Clip or notch your seam allowance after sewing, so the fabric relaxes when turned.
Practise on scrap fabric first; once you’re comfortable turning a small curved sample, the stocking will feel straightforward.
Choosing Beginner-Friendly Fabrics
If you’re a complete beginner to sewing or you’re trying how to sew a lined Christmas stocking for the first time, choose fabrics that behave nicely:
- Quilting cotton – stable, doesn’t stretch, easy to press and sew.
- Cotton-blend flannel – cosy feel but still easy to control.
- Lightweight felt – doesn’t fray, ideal for appliqué and hand stitching.
Fabrics like velvet, faux fur or heavy wool look beautiful but can slip or bulk up your seams, so you may want to use them just for the cuff while keeping the main stocking body in a beginner-friendly cotton. Fabric guides for stockings frequently highlight cotton velvet and medium-weight wovens as a good balance between structure and sewability.
How to Fix Common Sewing Mistakes
Even confident sewists unpick seams from time to time. When learning how to sew a Christmas stocking with lining, these are the most common issues and quick fixes:
- Lumpy curves – you may not have clipped enough seam allowance. Carefully unpick just that area, resew the curve more smoothly and clip more deeply (but not through the stitching).
- Twisted lining – if the lining doesn’t sit flat inside, you may have twisted it before sewing the top edge. Check the orientation before stitching; if you’ve already sewn, unpick the top seam and rearrange.
- Cuff not lying evenly – make sure the cuff and stocking are both quartered and that the cuff seam sits at the back. Uneven distribution of fabric can cause the cuff to tilt.
- Gap left visible – if you forgot to close the turning gap, simply pull the lining out a little, close it and tuck it back in.
DIY Creative Ideas to Personalize Your Christmas Stocking
Upcycled Fabric Christmas Stocking Ideas
If you like sustainable crafting, you can absolutely learn how to sew a Christmas stocking with cuff using upcycled materials:
- Old flannel shirts become cosy plaid stockings.
- Denim jeans turn into sturdy, casual stockings with plenty of texture.
- Vintage tablecloths or curtains can be transformed into nostalgic holiday décor.
When you upcycle, just make sure the fabric is clean, not too thin (or plan to add interfacing), and large enough to cut your stocking pieces. Combining an upcycled outer with a new cotton lining is a nice compromise between character and durability.
Embroidery or Name Lettering
One of the biggest advantages of sewing your own stocking is how easy it is to personalise names. To add a name:
- Hand embroider the name on the cuff before attaching it to the stocking.
- Use iron-on letters or vinyl if you have access to a cutting machine.
- Cut appliqué letters from felt or fabric and stitch them on with a narrow zigzag or blanket stitch.
Many stocking tutorials highlight name personalisation as a key reason people choose handmade; it’s a simple way to make sure each family member has a unique design that can be treasured for years.
Lace, Pom-Poms, and Ribbon Decorations
After you’ve mastered the basic construction of how to sew a Christmas stocking with lining and cuff, embellishments are the fun part. Try:
- Lace trim along the cuff edge for a vintage look.
- Pom-pom garlands stitched just below the cuff seam.
- Ribbon bows at the side or where the loop attaches.
- Buttons, bells or small charms stitched securely for extra sparkle.
Just remember to keep heavy embellishments away from the toe area if you plan to stuff the stocking full of treats.
Printable & Free Christmas Stocking Patterns
If you’d like a ready-made template rather than drawing your own, there are many free printable patterns available. These are especially helpful if you’re brand new to sewing and want a tested shape and clear instructions for how to sew a Christmas stocking from start to finish.
| Source | What it offers | Pattern format |
|---|---|---|
| LearnCreateSew | Fully lined stocking with fold-over cuff in several sizes | Free PDF pattern & photo tutorial |
| My Golden Thimble | Stocking pattern in four sizes with detailed instructions | Free PDF pattern (A4, Letter, A0) |
| Bernina blog | Quick stocking with free template and step-by-step guide | Free template & blog tutorial |
| Superstar Worksheets / Printablee | Printable stocking outlines for kids’ crafts and simple felt stockings | Free printable templates |
| Choose patterns that include lining and cuff instructions if you want to follow this 7-step method closely. | ||
Many sewists like to try more than one pattern to find their favourite shape, especially if they’re sewing stockings for multiple people and want a consistent style.
FAQ
1. How long does it take to sew a Christmas stocking?
The time depends on the design and how much detail you add. Simple tutorials for a basic, lined stocking with cuff suggest you can complete one in around 45–120 minutes of active sewing, once your pieces are cut. More intricate designs with quilting, detailed appliqué or hand embroidery can take several evenings or even weeks if you work on them gradually, especially for heirloom-style stockings.
2. Can beginners sew a stocking without a sewing machine?
Yes, you can hand-sew a stocking, although it will take longer. Use smaller, even backstitches for strength, especially around the toe and heel curves, and reinforce the hanging loop area. Because this guide focuses on how to sew a Christmas stocking with lining and cuff, you’ll need patience to hand-stitch all those layers, but it’s absolutely possible. If you’re brand new, you might start with felt, which doesn’t fray and is easier to hand sew.
3. What fabric is best for a DIY Christmas stocking?
Most stocking patterns recommend medium-weight woven fabrics such as quilting cotton, cotton velvet, linen, flannel or wool for the outer layer, paired with a smooth cotton lining. Quilting cotton is the most beginner-friendly because it’s stable and easy to press, while velvet or faux fur give a more luxurious look but require more care when sewing. Felt and wool blends are ideal if you prefer hand-stitching and appliqué.
4. Where can I download a free Christmas stocking pattern?
You can find free printable patterns from several sewing blogs and pattern companies. LearnCreateSew offers a free fully lined stocking with fold-over cuff; My Golden Thimble provides a multi-size pattern in different paper formats; Bernina’s blog and Fabrics-Store tutorials also include free templates and instructions; and sites like Superstar Worksheets or Printablee share simple outlines good for kids’ felt stockings or craft projects.
5. Can I make a stocking using old clothes or upcycled fabric?
Definitely. Learning how to sew a lined Christmas stocking means you can safely use upcycled outer fabrics as long as they’re clean and sturdy enough. Old flannel shirts, denim jeans, curtains and tablecloths can all be turned into characterful stockings. For very lightweight or stretchy fabrics, add fusible interfacing or pair them with a stable lining to keep the stocking in shape when filled. Upcycling is also a good way to practise before cutting into expensive holiday fabrics.
6. How do I add a name to a handmade Christmas stocking?
The easiest way is to add the name to the cuff before you sew it to the stocking. You can hand embroider it using simple stitches, use iron-on or vinyl letters, or appliqué fabric or felt letters with a narrow zigzag stitch. Many modern stocking tutorials highlight name personalisation as a key feature and often suggest embroidery or appliqué as a final step once the stocking is assembled.
Conclusion
Now you know exactly how to sew a Christmas stocking from start to finish – including how to sew a Christmas stocking with cuff, how to sew a Christmas stocking with lining, and even how to sew a Christmas stocking with lining and cuff in one project. With a simple template, some beginner-friendly fabrics and this seven-step method, you can create stockings that are cosy, durable and completely personalised. Once you’ve made one, it’s easy to sew a whole set for family and friends, experimenting with fabrics, trims and upcycled materials. Most importantly, every time you hang those stockings, you’ll know they carry not just gifts, but the time, care and creativity you put into making them.
References
- Aboderie. (2024, October 28). How to sew DIY Christmas stocking (free pattern).
- Applegreen Cottage. (2025, November 11). Christmas stocking pattern – free, easy, and beautiful!
- Bernina. (2022, December 3). Sewing Christmas stocking: Free instructions and pattern.
- Craftematics. (n.d.). How to sew a Christmas stocking.
- Crafty Sewing Sew. (2021, August 6). 9 best fabric for Christmas stockings.

Hi, I’m Natalia, a passionate education advisor committed to helping students pursue their dreams through international study. Growing up in a small town and later attending a prestigious university, I’ve seen firsthand how transformative education can be. I created this platform to support families and students on their journey to studying in Australia, offering practical guidance, strategic planning, and inspiration. My mission is simple: to make quality education accessible, joyful, and empowering for every learner.